Are you satisfied with your internet speed? Maybe some of you are not satisfied with. Sometimes it works so fast and quick,but sometimes it works too slow perhaps. And now, let's solve your problem with SG TCP Optimizer. Maybe this words is kind of new for you. Well,actually SG TCP Optimizer is free and easy Windows program that helps you to tweak TCP and IP related parameters in Windows Registry to speed up your Internet speed.
The good point of
SG TCP Optimizer is applicable in all types of
internet connection, whether it’s
cable modem connection,
DSL connection, lease line or
dial up connection. This software is relevant for you who want to increase or
optimize internet connection speed. That is why i suggest you to try
SG TCP Optimizer ::. Download
You can download free SG TCP Optimizer here. The new version of SG TCP Optimizer also support VIsta OS ;) .
::. Screenshot
![clip_image001[4]](https://blogger.googleusercontent.com/img/b/R29vZ2xl/AVvXsEg21obsnVnQfSgjRYVKutmzyGpheOQKjlB6n7c_1NJiTRmA-Pks0uUvNapMKrnA_cArfGTbt5F8_MuE-Q-Icys-APBjgesTX5_JC6OVANVR-DGxJWP3guQWgRw-vxNyPXnDP3fmEmrXmA13/?imgmax=800)
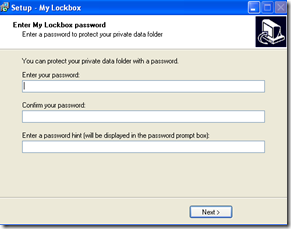
::. How - To
Once you finished download SG TCP Optimizer,double click the program u have downloaded to run it (it no need to installed first,just download and run :) ) As you can see on the picture above,it is the screenshot of SG TCP Optimizer.
- Before we do some simple tweaking to our registry,we should test our internet connection speed first.It help us to compare between the before-tweaking-internet-speed and after-tweaking-internet-speed. O yea,almost forgot:you can test your internet connection speed here . And this is my internet speed before i tweak my registry:

- Well,let's start our adventure to optimize our internet connection speed. As I told you before,run the program(SG TCP Optimizer) u have downloaded before by double click on the program icon.
- And then choose your maximum internet connection speed on the slidebar. Note: the scale on the slidebar is Kbps (if your connection scale is Mbps,just times it by 1000 to convert it become Kbps;for example,if your connection speed is about 2 Mbps,so it means your speed is 2000 Kbps). My maximum speed is about 1 Mbps so i choose 1024 Kbps

- Next step is to tick Modify All Network Adapters,and don't forget to select Optimal settings before click on Apply Changes.

- Once,you have to tick backup option to backup your registry settings and click OK,and to see the result,restart or reboot your computer.
![clip_image001[6]](https://blogger.googleusercontent.com/img/b/R29vZ2xl/AVvXsEjtW0TYZl529c0mPCbSJG96vdYfHBDZ4x4e-VQHH37Y2okaNEzbLqyozqDJnrNgDwHrHdlEfkxaod7buOjgmeoVu_xcZ85eSDsOlvv2ctKPudHZ_1fi44NZdNWUA7d_2TiT5mZBrrjf_Ttm/?imgmax=800)
- After restarting your computer,let's do the same internet speed test we have done before to compare our internet speed between before tweaking,and after tweaking.
- And,voila. This is my after tweaking result:

- As you can see. My internet connection speed have significant improvement from 492 Kbps -> 524 Kbps (download stream). But a little improvement on upload speed : 78 kbps -> 91 kbps
I hope u feel satisfied with your internet connection speed after you try this tips (SG TCP Optimizer free download) . Feel free to ask me about any trouble or difficulties u got when attempt my tips above. Happy tweaking!
Return
Readmore,..


 Many blogger who use BLOGSPOT service for their blog platform (like me ;) ) feel disappointed when they can't put different Meta tags in different blogger posts, on the other hand,Wordpress user can do this(add different Meta tags in different posts) so easily with SEO tools or something like that which wordpress provides. But, no need to worry about that,or even thinking to change your blogspot become Wordpress or something else. Just follow my tips explained below,and you can add different Meta tags in Different blogger Posts.


![clip_image002[5]](https://blogger.googleusercontent.com/img/b/R29vZ2xl/AVvXsEi648IysuWMtjwT-PrrC6H_Z6w_135LhU2pJCz7ms_q0VqMeP54r-NotQ-iZnp393mMdDomdqyFcXGZL9YoaJTBBnXBKADTydHqqQqXT8_3tlHY6DjRDqgxhmJsZgD6TZA7Q9GaNIdo-15N/s1600-h/clip_image00253.jpg)


